• Home
  • Recipes
  • Blog
  • About
  • Contact
  • Home
  • Recipes
  • Blog
  • About
  • Contact
Real Life Outlaw
  • Home
  • Recipes
  • Blog
  • About
  • Contact

Blog

by Sarah Outlaw
Access Octomono Masonry Settings
I blog about real food, nutrition, DIY, and herbal wisdom…the Outlaw way!
    Picture

    About Me

    ​I want to help change the lives of others the way my life was changed through better health. I am an advocate of getting back to natural, as much as possible. 

    Subscribe

    email > Subscribe
    Categories


    All
    Adaptogen
    Allergies
    Almond
    Apple
    Asparagus
    Autumn
    Baby
    Banana
    Bars
    Bath Salt
    Berry
    Blueberry
    Body Butter
    Body Scrub
    Bread
    Breakfast
    Butternut Squash
    Cake
    Cardamom
    Cereal
    Chai
    Chia
    Chicken
    Chicken Wings
    Chocolate
    Christmas Gifts
    Cinnamon
    Cocktail
    Coconut
    Cold
    Cold Care
    Comfrey
    Cough
    Cucumber
    Desserts
    Detox
    DIY
    Dried Herbs
    Drinks
    Elderberry
    Electrolyte
    Elixir
    Fall
    Flat Bread
    Food Allergies
    Fries
    Fruit
    Garlic
    Gelatin
    Ginger
    Gluten Free
    Gluten-Free
    Grain
    Grain Free
    Harvest
    Headache
    Healing
    Herbal
    Herbal Remedies
    Herbal Tea
    Herbs
    Hibiscus
    Holiday
    Honey
    Ice Cubes
    Kickstarter
    Kids
    Lemon
    Lip Scrub
    Lotion
    Lunch
    Maca
    Macaroons
    Main Dish
    Mangos
    Meal Plans
    Medeira
    Migraines
    Mocktail
    Molasses
    Muffins
    Natural Living
    Nuggets
    Oatmeal
    Oil Blend
    Organic
    Pain
    Paleo
    Pancake
    Parfait
    Peaches
    Peanut Butter
    Pear
    Picnic
    Pizza
    Pot Cream
    Pregnancy
    Protein Balls
    Pumpkin
    Pumpkin Pie
    Radish
    Ranch
    Real Food Basics
    Real Life
    Recipes
    Remedies
    Salad
    Salmon
    Sandwich
    Seasonal Allergies
    Shrimp
    Side Dish
    Smoothie
    Smoothie Bowl
    Snacks
    Soap
    Sore Throat
    Soup
    Southwestern
    Spaghetti
    Spice
    Spices
    Spicy
    Spray
    Squash
    Sriracha
    Strawberry
    Stress
    Stress Relieve
    Sugar
    Summer
    Syrup
    Tea
    Teething
    Teriyaki
    Thyme
    Tincture
    Toddler
    Tuna
    Valerian
    Varicose Veins
    Vinaigrette
    Waffle
    Water
    Weight
    Weight Loss
    Workout
    Wraps
    Xana
    Yogurt
    Zucchini

    ARCHIVES

    Archives

    June 2022
    February 2022
    January 2022
    December 2021
    November 2021
    October 2021

    RSS Feed

⇠ Back To Blog

Organic Chocolate Chip Banana Bread

2/7/2022

 
Picture


My family LOVES banana bread, especially if it has chocolate chips in it. I have a recipe that I got from Erin Krug of Krug’s Eco-Logic awhile back that I adapted and modified to be organic and healthier than other versions I have seen. It is so moist and delicious that you will want to keep a loaf or two around at all times!

This recipe can be modified even more to be either gluten-free or made with soaked or sprouted flour. You can also play with the sweetener because the bananas, applesauce, and chocolate chips really do add to it. I find myself putting in less and less sweetener in each time.

If you try to make this with white flour, white sugar, and artificial chocolate chips it won’t taste as good as this recipe, guaranteed!
​
Ingredients:
​
  • 6 Mashed Organic Bananas
  • 4 Organic Free-Range Eggs (Preferably from a local farm)
  • 2 Teaspoons Organic Vanilla (or use homemade)
  • 3/4-1 Cup Organic Sucanat, Rapadura or Raw Honey
  • 2 Cups Organic Whole Wheat Flour, Einkorn Flour (or substitute gluten-free, soaked, or sprouted flour)
  • 2 Teaspoons Aluminum-Free Baking Powder 
  • 2 Teaspoons Sea Salt (I like Real Salt)
  • 1 Stick Organic Butter
  • 1/2 Cup Organic Applesauce (or use homemade)
  • 1 Cup Organic Chocolate Chips


Method:
​
  1. Mix together wet ingredients and add dry ingredients.
  2. Blend well and add chocolate chips.
  3. Pour into two loaf pans that have either been buttered and floured or lined with parchment paper.
  4. Bake in a 350 degree oven for 50 minutes. Let cool on a wire rack and then remove from pans.
​
Picture
Picture
Picture

Serve and keep leftovers in the refrigerator, if you have any!

This banana bread is wonderful with breakfast or a quick snack.

Enjoy!
​
What’s your favorite way to enjoy bananas?

Comments
⇠ Back To Blog

Grain-Free Chocolate Chip Banana Bread

2/7/2022

 
Picture


Banana bread is a staple in our house. We get bananas free from our church’s food ministry so I always have an abundance. My favorite banana bread recipes are Organic Chocolate Chip Banana Bread and Soaked Banana Bread. Or, at least they were…

Now that we are grain free (at least for January) I needed a grain-free alternative. I wasn’t about to waste overripe bananas. I found a grain-free banana bread recipe over at my friend Kristen from Rethink Simple’s blog that is amazing! I asked her if it would be ok to modify it for my blog and she said yes! Yay! Now there’s a new banana bread in town!

I’ve made this grain-free banana bread 6 times in the last week-and-a-half. I kid you not! I am serious about getting a recipe perfect! I used Kristen’s base recipe for things like flour, eggs and baking powder amounts but revamped it because I wanted to add some ingredients.

When working with coconut flour you have to make sure you have enough liquid. Coconut flour is very fibrous and quickly absorbs the liquid that is added to it. If you don’t add enough, you will have a very grainy and rather unpleasant end result. 

I’ve been obsessed with adding gelatin to everything lately! I like to use Gelatin Hydrolysate for recipes that don’t need to be “gelled”. It adds nutrients to whatever it’s added to. You’ll see it pop up in many of my more recent recipes. 
​
As always, there are links within the recipe itself to where you can easily purchase the ingredients. 

Ingredients:
​
  • 1/2 cup coconut flour
  • 1 tsp baking powder
  • 1/4 tsp salt (I like Real Salt)
  • 4 ripe bananas
  • 4 eggs
  • 1/4 cup coconut oil
  • 3 TBS to 1/4 cup maple syrup (grade B has more minerals)
  • 2 TBS applesauce (here is a recipe for homemade)
  • 2 tsp vanilla (I like homemade or this brand
  • 2 TBS gelatin hydrolysate - CANNOT use regular gelatin!
  • 1/2 to 1 cup soy-free chocolate chips (can buy here or here)


Instructions:
  1. Preheat oven to 350 degrees F.
  2. Line a loaf pan (bottom and sides) with parchment paper.
  3. In a large bowl crack eggs and add coconut flour, baking powder and salt. Mix well.
  4. Mix gelatin and maple syrup together in a small bowl and add to mixture.
  5. Melt coconut oil if solid and add to bowl along with remaining ingredients.
  6. Mix well and allow to sit for about 5 minutes.
  7. Pour into prepared pan and bake at 350 degrees F for about 1 hour. It takes mine about 1 hour 10 minutes for a knife inserted in the center to come out clean.
  8. Remove from oven and allow to cool on a baking rack.
  9. Can be eaten warm or cold.
  10. Store in the refrigerator.


This Grain-Free Chocolate Chip Banana Bread is my new favorite recipe! It is very moist and not overly sweet. I have to make two loaves for it to last into the next day with my hungry crew!


​Be nourished. Be happy.
Enjoy!

Comments
⇠ Back To Blog

Grain Free Chocolate Zucchini Bread (with sans chocolate option)

2/7/2022

 
Picture
  

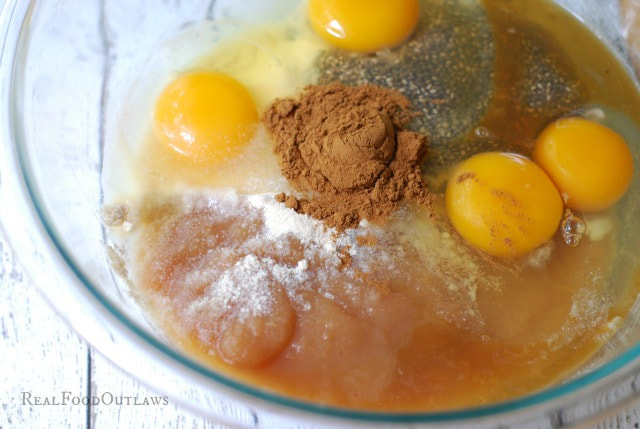
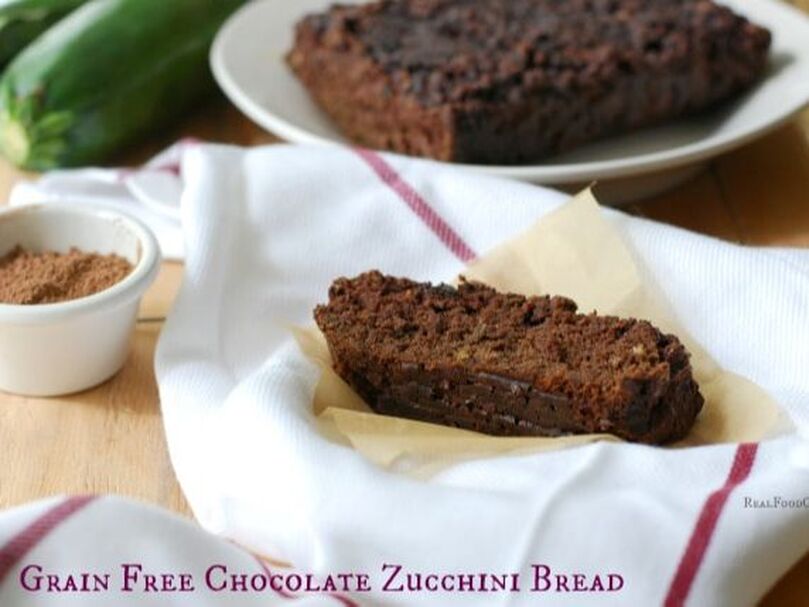
I always seem to have a zillion zucchini around here in the summer!

They multiply like bananas and I need to find things to do with them. I like making zucchini noodles like these Nettle-Basil Pesto Noodles, or Sautéed Zucchini.

Zucchini is very versatile. It will take on the flavor of whatever you cook it with so it can be used in savory or sweet dishes. Sweet is what I have been wanting since I have been off of all sugars (and grains), even fruit for three months to heal my adrenals.

Now that I can have a *little* maple syrup here and there, I used a small amount in my grain free chocolate zucchini bread recipe to give it just a hint of sweetness. It doesn’t take much after going cold turkey off sugar to be highly sensitive to sweet! I also used homemade applesauce made without any added sugar to give it a little extra sweetness.
 
If you are completely off all sugars, you can substitute stevia. Add it little by little as the last thing you put in, and do it to taste. 

Can’t have eggs? That’s ok! Use chia or flax seed as a substitute. To make a chia or flax seed egg substitute, simply put a few tablespoons of the seeds in a jar. Cover with water. The seeds will turn into a gel-like substance that you can add to a recipe in place of eggs. I use a heaping tablespoon per one egg.

I like using coconut flour for my fruit-based, grain free breads like my banana bread or blueberry bread. I use almond flour quite often for other breakfast items like our favorite grain free waffles, or these amazing lemon pancakes, and lunch wraps or flat bread. I like to mix it up so I’m not eating too much of one thing.

The zucchini I used in this recipe was so huge that I was able to make 3 loaves and still have a quarter of it left. You only need a cup of shredded zucchini per loaf so it can easily be stretched. Great for the budget!

Picture

​
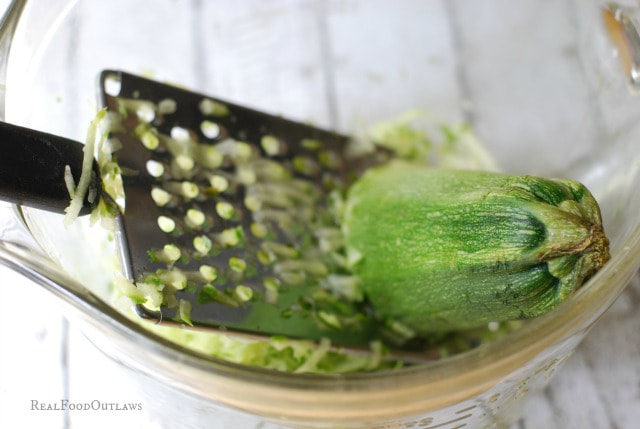
​This recipe makes one loaf. If you want to double it, you can. I like to double the recipe but not double the eggs. The photo above shows a doubles recipe with 4 eggs and 4 TBS chia seed “gel”.
​

Ingredients:
  • 1/2 cup coconut flour
  • 1/4 cup cocoa or cacao powder (optional - leave out if you want plain zucchini bread)
  • 2 TBS Great Lakes Gelatin Hydrosylate (optional)
  • 4 eggs (or 4 heaping tablespoons of chia seeds soaked in water as an egg substitute)
  • 1/3 cup coconut oil or butter, melted
  • 4 TBS applesauce
  • 2 TBS - 1/3 cup maple syrup (I use organic, Grade B)
  • 2 tsp vanilla extract
  • 1/2 teaspoon salt (I like Real Salt)
  • 1 tsp baking soda
  • 1 tsp ground cinnamon
  • 1 cup grated zucchini (peeled if not organic)


Instructions:
​
  1. Preheat oven to 350 degrees F.
  2. Mix the dry ingredients in a mixing bowl and add wet ingredients one by one.
  3. Add zucchini last.
  4. Stir well after each addition.
  5. Let mixture sit for at least five minutes.
  6. Line a loaf pan with parchment paper.
  7. Pour batter into pan.
  8. Bake at 350 degrees F for 50 minutes to an hour, or until a knife inserted into the center comes out clean.
  9. Allow to cool in pan for at least 15 minutes and then transfer to a wire rack.
  10. This bread will be crumbly so handle gently when transferring and slicing.
  11. Can be stored in the refrigerator.
​
Picture

 When working with coconut flour, be sure to measure precisely. Also, letting the mixture sit for at least five minutes will allow the dense coconut flour to absorb the moisture and be less “gritty”.

This batter will be fairly thick (almost crumbly, but wet) like a cookie batter. It’s not smooth or runny like a cake batter. Does that make sense?
​
The end result is a moist, dense cake-like bread that is wonderful paired with a cup of tea, or Swiss water decaf coffee, or a tall glass of raw milk!


​What’s your favorite way to eat zucchini? 


Be nourished. Be happy.
Enjoy!
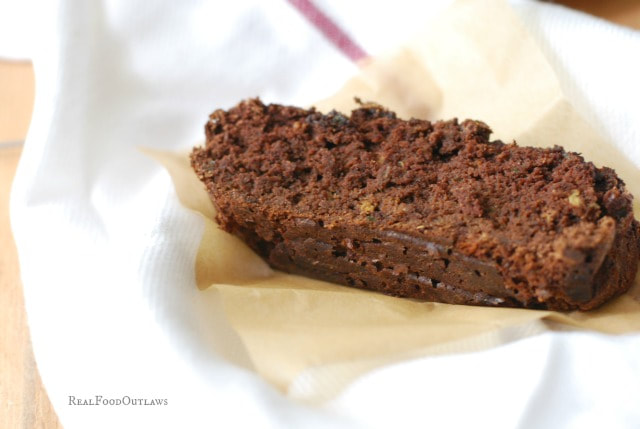
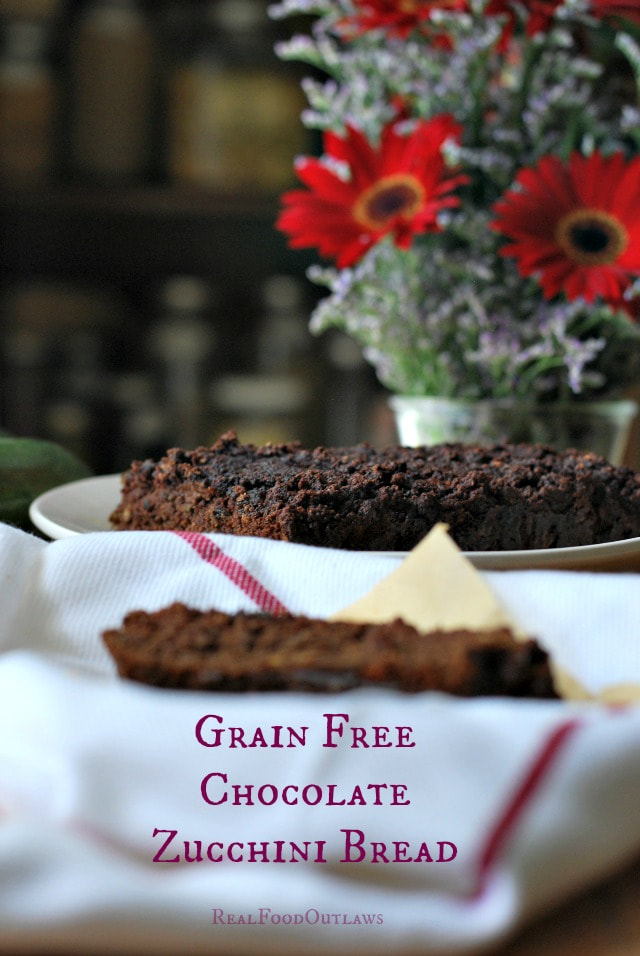

Picture
Picture


Comments
⇠ Back To Blog

Cassava Flour Chocolate Cake

10/18/2021

 
Picture

I was thrilled to hear that Erin from Eat Real, Stay Sane was going to bake up a Cassava Chocolate Cake for us this month! It’s a great option for grain-free, gluten-free birthdays and celebrations!


One caveat to this recipe: you all know I am very strict with sugar. There is quite a bit of sugar in this recipe. Natural or not, sugar is sugar. It’s ok to use less than the recipe calls for. I know I prefer a less sweet cake. Remember, this is a special occasion treat!

​Cassava Chocolate Cake – by Erin Smith

Before I’d gotten on the real food bandwagon, someone at work brought a store-bought, gluten-free cake.

Most coworkers kept their distance, making snide remarks like “If I’m gonna eat the calories….”

I was among the brave who tried it, and I wish I hadn’t. Terrible, disgusting, flavorless. Contrary to popular belief, chocolate DOES NOT cover all else.

In other words, I know what a bad chocolate cake tastes like, and this ain’t it.

In order to achieve “gluten-free” status, I used cassava flour (it’s all the rage amongst the real foodies). It’s a starchy root, kind of like a potato. Just don’t imagine that it tastes like you’re adding potato flakes, because that would be gross.

Cassava flour has a slight earthy taste to it, but in a good way. It is extremely nutritious, containing good sources of potassium, vitamin C, fiber, and even some protein, iron, and magnesium.

The beautiful part is that you can trade it out in a 1:1 ratio with flour, and still keep a similar consistency. I’d say it’s slightly denser than normal cake, but it just makes it a little fudgier… so no complaints here.

A couple weeks ago, it was our Little Man’s 2nd birthday, which is crazy and insane. He’s not much of a dessert eater – he signs “grapes” or “strawberries” pretty much at every meal. He needed a little encouragement to dig into his chocolate cassava flour cake, but once he did, that stuff got ate.
​

My parents also devoured the cake and passed along rave reviews.


Along with the cassava flour, you’ll see that I’ve used sucanat, organic sugar, and other healthier ingredients. I wouldn’t call this a weight loss meal, but it sure beats processed, GMO ingredients that provide no nutritional benefit or even block other nutrients from entering your system.

In other words, it’s a dessert you can be confident your family will like, and you can sit back, arms crossed, smiling at your achievement. You can check out our date cake and brownie recipe too if those sound tasty to you.

Enjoy your cake!


Ingredients:

Buttercream Frosting
  • 3 Cups organic powdered cane sugar
  • ½ Cup softened pastured butter
  • 1/2 Cup cacao powder
  • 2/3 Cup raw milk

Cake
  • 1 Cup sucanat
  • 1 Cup organic cane sugar
  • 1 Cup softened pastured butter
  • 1 Cup warm filtered water
  • 1 Teaspoon real vanilla
  • 2 pastured eggs
  • ½ Cup cacao powder
  • 1 ½ Cups cassava flour
  • 1 Teaspoon baking soda
  • 1 Teaspoon unrefined sea salt


Instructions:

For Cake:
  1. Preheat oven to 350 degrees and line bottom of 8-inch cake pan with parchment paper and butter.
  2. Cream Sucanat, sugar, softened butter.
  3. Add cacao, warm water, and vanilla.
  4. Mix in eggs one at a time until combined. Do not over-mix or your cake will come out flat.
  5. In separate bowl, sift together cacao, flour, soda, and salt. 
  6. Slowly add flour mixture to wet mixture and mix until combined.
  7. Pour half of the mixture into cake pan and bake for 20-25 minutes until edges look crisp and knife comes out clean when inserted into the middle.
  8. Immediately after taking pan out of oven, run a knife around the edge of the pan. After about 10 minutes, remove from pan and let cool on a cooling rack.
  9. Repeat baking process for second layer.

For Frosting:
  1. Combine powdered sugar, butter, cacao, and vanilla.
  2. Add small amounts of milk until desired consistency is reached, usually very fluffy and not runny or your cake will slide all over. You probably won’t need the entire 2/3 Cup just FYI!
  3. After cake layers are cool, frost the top of one layer, add the top layer and frost the top then the sides. Store covered so the cake doesn’t dry out.
​

Eat Well & Thrive!

Comments
⇠ Back To Blog

Peanut Butter Cups. Quick and Easy.

10/18/2021

 
Picture

It’s like clockwork every month! Our hormones go amok, and we’re hit with PMS and the accompanying sweet tooth cravings. Why does this happen? Our body’s natural response to hormonal changes around our period can cause a drop in blood sugar levels. And this can lead to cravings for foods loaded with sugar. Also, if you are specifically craving chocolate, that’s your body yelling at you that you need magnesium.

Sure, it’s nice to treat yourself during this time. Heck, you deserve it! But you should still be mindful to not overdo it with junk food that can sabotage your health goals. You may enjoy it for a moment, but once the sugar rush dissipates, you’re right back to craving sweets again.

There’s more. Sugar, particularly refined sugar, is an inflammatory that causes your body to retain water and sodium. This may cause you to experience more bloating, cramping, and mood swings. No, thank you!

So, what’s a girl in the throes of PMS to do? Don’t worry, I have a special treat for you to satisfy these cravings when they hit.

Ingredients to Beat Those Period Cravings

It’s my recipe for a healthier version of your traditional sugar-laden peanut butter cups. These quick and easy homemade chocolate peanut butter cups are the perfect treat to nip those pesky PMS cravings we get every month. Made with all-natural good-for-you ingredients, they’re delicious AND nutritious. All you need are three simple ingredients: dark chocolate, coconut oil, and peanut butter. It’s that simple!

Now, let’s talk about those ingredients. You may be wondering, is dark chocolate really ok during your period? Surprisingly, it is! Not only can dark chocolate satisfy your sweet tooth during that time of the month, but it’s high in potassium. This nutrient can stop you from retaining water and feeling bloated. Potassium also helps your muscles to function, which is ideal for when period cramps hit.

Then there’s peanut butter, which can benefit your health in many ways. It contains healthy fats, fiber, and protein that can help you feel fuller longer. And it’s full of nutrients and vitamins like vitamin E, which reduces inflammation and can help with cramping. Plus, peanut butter is a complex carbohydrate, so it breaks down more slowly in your system. This means you don’t experience the big spike in blood sugar levels that can come with refined sugar.

For our third and final ingredient, we have coconut oil. This superfood can actually help balance your hormones, which can go all sorts of crazy during your period. How? The fatty acids in coconut oil can help hormone functions that support the creation, processing, and elimination of estrogen and progesterone. This can lead to the hormonal balance your body needs.

Ok, enough chatting. Here’s everything you need to know to make these bad boys!
​

Healthy Homemade Peanut Butter Cups

A quick and easy recipe for that time of the month.

No-Bake, Raw, Gluten-free, grain-free, low carb, low sugar, vegan, vegetarian, dairy-free, egg-free, Paleo, Keto
​
Prep Time: 15 minutes
Chilling Time: 30 minutes
Total Time: 15 minutes
Servings: 12

Ingredients:

  • 8-12 ounces dark chocolate
  • 1 cup all-natural creamy peanut butter, with no added sugar (almond butter if Paleo)
  • 6 tablespoons virgin coconut oil, melted


Directions:

  1. Line a 24-cup mini muffin pan or spray with coconut oil cooking spray and set aside.
  2. Chop chocolate into small pieces. Place in a medium glass bowl and add 3 tablespoons of coconut oil.
  3. Place the bowl over a pot with simmering water. Continually stir with a wooden spoon or spatula until chocolate is completely melted to avoid burning the chocolate.
  4. Once the chocolate is melted, set heat to low.
  5. Pour 1 tablespoon melted chocolate into each cup. Place cups in the freezer for 5 minutes or until chocolate is set while making the peanut butter layer.
  6. Add peanut butter and 3 tablespoons of coconut oil to a medium bowl. Stir until incorporated evenly.
  7. Take the muffin pan out of the freezer and scoop 1-2 teaspoons of the peanut butter mixture to each cup. Place in the freezer for 15 minutes.
  8. Take the muffin pan out of the freezer and pour the remaining melted chocolate on top of the peanut butter. Return to the freezer for 30 minutes.
  9. Once set, pick up the muffin pan and shake and tap to help release the chocolate cups.
  10.  Optionally, sprinkle a pinch of Himalayan sea salt on top.
  11.  Enjoy!
​

Storage:

Place them in a freezer-safe container, store them in the fridge or freezer and enjoy anytime you need a healthy treat! They should last about 3 months or longer.
​

Consistency:

If the peanut butter cups are too thick, add an extra tablespoon of coconut oil or peanut butter.
​

Note:

 If you’re allergic or sensitive to peanuts, you can sub any nut butter (almond, cashew, hazelnut).
​

Guilt-Free Treat to Calm PMS Cravings


I hope you love these nutritious treats to calm your PMS cravings. What’s your favorite sweet treat or guilty pleasure snack when you PMS? Let us know in the comments.

Did you make this quick and easy recipe? Don’t forget to share a picture and mention @reallifeoutlawblog and #reallifeoutlaw.

Be Well & Thrive!

Comments
⇠ Back To Blog

Dark Chocolate Blueberry Oat Protein Balls

10/15/2021

 
Picture

On those crazy, hectic days when you’re feeling drained and don’t have the energy or time to make a healthy snack, don’t settle for the vending machine.
​
Instead, whip up a batch of these delicious dark chocolate blueberry oat protein balls for an easy pick-me-up that will keep you feeling satisfied for hours.

Stress Relief

Bonus, these protein balls packed with ingredients that can help relieve stress!

Oats help the brain produce serotonin, a hormone which creates a soothing feeling to overcome stress.

Studies have shown one to two ounces per day of dark chocolate can significantly improve mood and mood chemicals in the body. Make sure to use dark chocolate with at least 70 percent cocoa or higher to get this stress relieving benefit.
​
Blueberries are high in antioxidants and help reduce cortisol levels. Cortisol is a hormone associated with stress.

Options

The recipe doesn’t require a sweetener, but if your sweet tooth calls for it, you can add one to two teaspoons of stevia or maple syrup to taste.
​
If you want a super chocolatey treat, substitute chocolate protein powder for vanilla.

A Portable Treat

Have you ever had to run off somewhere with a hungry belly and absolutely nothing healthy in the fridge or pantry to bring with you to take care of those hunger pangs? If so, these protein balls are the perfect solution.

I suggest making a batch or two and storing them in the freezer. When you’re on the run, grab a couple, and the protein balls will defrost as you run your errands. Or pop them in the microwave for 10 seconds for a warm brownie-like treat.
​
You have yourself a quick, portable treat!

Storage

They’ll keep well in a BPA-free air-tight container in the fridge for up to 1 week or in the freezer for up to 3 months.

Whip up a batch of these delicious dark chocolate blueberry oat protein balls for an easy pick-me-up that will keep you feeling satisfied for hours.
​
Prep Time: 15 minutes
Cook Time: 0 minutes
Servings: 2-4
​

Ingredients:

  • 1 cup old-fashioned rolled oats
  • 2 scoops vanilla protein powder (I prefer Standard Process Veg-E Pro Complete)
  • 1/2 cup unsweetened cocoa powder
  • 2 cups blueberries
  • 3 tbsp water


Directions:

  1. In a large bowl, make your dry mix by combining the oats, protein powder and cocoa powder. Mix well.
  2. In a food processor, pulse the blueberries until pureed. Add to the dry ingredients and stir.
  3. Slowly add 1/2 a tablespoon of water at a time to the mixture until it forms a sticky thick fudge consistency.
  4. Using 2 tablespoons of the mix each, roll into small balls and enjoy.
​
What do you like to eat when you’re on the run? Share in the comments. I’d love to know!

Be Well & Thrive!

Comments
Just Breathe

Latest Blogs

Kava DSM Fall Favorites...
5 Spices You Should Be Cooking...
​Stuffed Zucchini Boats 2 Ways
​
Cassava Flour Chocolate Cake

Useful Links

About Sarah
Recipes
Blog
​Contact

About RLO

Real Life Outlaw is dedicated to providing crucial nutrition facts and individual health advisory.
​© 2021 Real Life Outlaw. Site by Northgate Marketing