• Home
  • Recipes
  • Blog
  • About
  • Contact
  • Home
  • Recipes
  • Blog
  • About
  • Contact
Real Life Outlaw
  • Home
  • Recipes
  • Blog
  • About
  • Contact

Blog

by Sarah Outlaw
Access Octomono Masonry Settings
I blog about real food, nutrition, DIY, and herbal wisdom…the Outlaw way!
    Picture

    About Me

    ​I want to help change the lives of others the way my life was changed through better health. I am an advocate of getting back to natural, as much as possible. 

    Subscribe

    email > Subscribe
    Categories


    All
    Adaptogen
    Almond
    Asparagus
    Autumn
    Baby
    Blueberry
    Breakfast
    Butternut Squash
    Cake
    Chia
    Chicken
    Chicken Wings
    Chocolate
    Cocktail
    Coconut
    Cold
    Cucumber
    Desserts
    DIY
    Drinks
    Electrolyte
    Food Allergies
    Fruit
    Gelatin
    Ginger
    Gluten Free
    Gluten-Free
    Grain Free
    Harvest
    Herbal
    Holiday
    Honey
    Ice Cubes
    Kickstarter
    Lip Scrub
    Macaroons
    Main Dish
    Mangos
    Meal Plans
    Migraines
    Mocktail
    Natural Living
    Nuggets
    Oatmeal
    Organic
    Parfait
    Peaches
    Peanut Butter
    Pear
    Picnic
    Pot Cream
    Protein Balls
    Pumpkin Pie
    Radish
    Ranch
    Real Food Basics
    Real Life
    Recipes
    Remedies
    Salad
    Shrimp
    Side Dish
    Smoothie
    Smoothie Bowl
    Snacks
    Sore Throat
    Soup
    Spaghetti
    Spices
    Spicy
    Squash
    Sriracha
    Strawberry
    Stress Relieve
    Summer
    Tea
    Teriyaki
    Toddler
    Varicose Veins
    Waffle
    Water
    Weight Loss
    Workout
    Yogurt
    Zucchini

    ARCHIVES

    Archives

    November 2021
    October 2021

    RSS Feed

⇠ Back To Blog

Grab ‘n’ Go Pancake Muffins from Everyday Grain-Free Baking

2/7/2022

 
Picture

I’ve been a devoted reader of The Nourishing Home Blog for a very long time. I love Kelly’s fresh take on recipes that are practical for my busy family. I am so excited to have the chance to review Kelly’s new book, ‘Everyday Grain-Free Baking‘, AND share her Grab n’ Go  Pancake Muffins (AKA Pancake Muffins on the Go) recipe!

With more than 100 irresistible recipes, Everyday Grain-Free Baking teaches you how easy it is to create grain-free, dairy-free versions of all your favorite baked goods.

From breads, biscuits and muffins to savory snacks and decadent treats, you’ll find step-by-step instructions, beautiful color photographs and helpful tips & tidbits to make all of your GF baking adventures a delicious success!

Here’s a quick overview of what you’ll find in Everyday Grain-Free Baking
​
  • More than 100 delicious, easy-to-make recipes that are gluten-free, grain-free, starch-free, refined-sugar-free and dairy-free, or contain dairy-free options.
  • My Journey to Healing is Kelly’s personal story shared to inspire those suffering from chronic illnesses that there is hope!
  • Why Bake Grain-Free? outlines the many benefits of grain-free baking.
  • Strategies for Maximizing Success features Kelly’s personal tips for ensuring that all of your grain-free baking adventures receive rave reviews!
  • My Grain-Free Kitchen includes an overview of the key ingredients that make grain-free baking a success, as well as recommendations for helpful baking essentials.
  • Tips & Tidbits and Recipe Variations are included throughout the book to make each recipe a snap – and provide you with even more options for making amazing grain-free baked goods that taste just like traditional favorites!
​
Picture

As shown above, Everyday Grain-Free Baking features a delicious assortment of recipes the whole family will love! In fact, there’s an entire chapter devoted to each of these traditional baked good favorites:
​
  • Breads & Rolls
  • 
Biscuits
  • Scones & Crackers
  • Muffins
  • Pancakes & Waffles
  • Pies, Tarts & Crisps
  • Cakes & Cupcakes
  • Classic Cookies
  • Brownies & Bars
  • Sweet Additions
​
Picture

Kelly’s mission in creating Everyday Grain-Free Baking is to transform the everyday comfort foods we each hold dear into delightfully flavorful and satisfying grain-free versions that are so remarkably similar to traditional gluten-based foods that everyone will enjoy these recipes, whether or not they’re living a GF lifestyle.

In fact, Kelly’s recipes really do taste like the real deal, because she knows so many of us struggle with the same challenge – trying to make tasty healthy foods that the whole family can enjoy without having to become a short-order cook!

As we all know, this can be especially challenging when some members of your family are living grain-free, while other members of your family are not. Finding recipes that will work for everyone that actually taste AMAZING is what Everyday Grain-Free Baking is all about! 
​
 Without further ado, here is Kelly’s Grab ‘n’ Go Pancake Muffin recipe!

Ingredients:

  1. 1/3 cup plain coconut milk yogurt (or coconut milk)
  2. 2 tablespoons unsalted butter (or coconut oil), melted
  3. 1 tablespoon honey (or maple syrup)
  4. 1 teaspoon pure vanilla extract
  5. ¼ teaspoon apple cider vinegar
  6. 1¾ cups blanched almond flour
  7. ½ teaspoon baking soda
  8. ¼ teaspoon sea salt
  9. 3 large eggs
  10. ¼ cup diced strawberries
  11. ¼ cup whole blueberries


Instructions:
​
  1. Preheat oven to 350°F. Grease 8 muffin cups in a 12-cup muffin tin with coconut oil. Set aside.
  2. Place all of the liquid ingredients except the eggs into a blender or food processor. Then place all of the dry ingredients on top. Cover and blend on low 10–15 seconds just until well combined. (Batter will be thick.)
  3. Add the eggs and blend on low about 15–20 seconds, then increase to high and blend 20–30 seconds, just until eggs are incorporated into the batter. (Do not overmix or muffins will not be tender.)
  4. Transfer the muffin batter to a bowl and fold in the berries. Evenly divide the pancake muffin batter among the 8 prepared muffin cups.
  5. Bake for 15–18 minutes, until slightly golden brown on top and a toothpick inserted into center comes out clean.
  6. Remove from oven and allow muffins to cool 2–3 minutes in the tin. Run a knife around the edges of each cup and invert the pan over a sheet of parchment. Then grab a couple and go!


These were so easy to make, and my kids and I really liked them! We will definitely be adding these into our breakfast rotation!
​
​Be sure to grab your copy of Everyday Grain-Free Baking today and rediscover the joy of baking everyday favorites your whole family will love! 

Picture
Comments
⇠ Back To Blog

Cassava Flour Chocolate Cake

10/18/2021

 
Picture

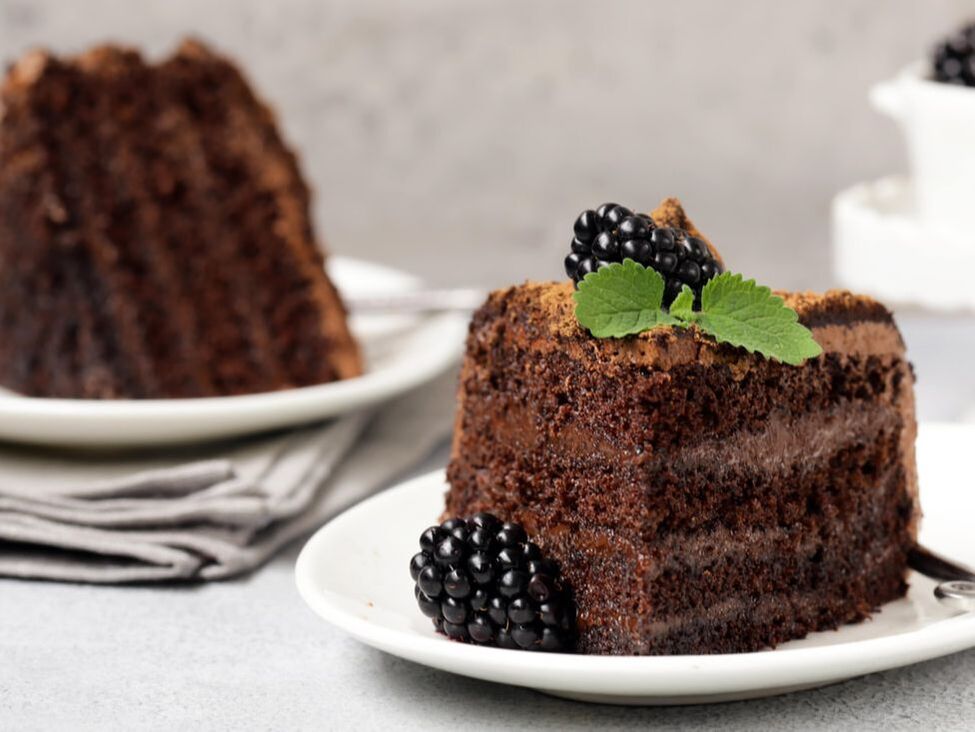
I was thrilled to hear that Erin from Eat Real, Stay Sane was going to bake up a Cassava Chocolate Cake for us this month! It’s a great option for grain-free, gluten-free birthdays and celebrations!


One caveat to this recipe: you all know I am very strict with sugar. There is quite a bit of sugar in this recipe. Natural or not, sugar is sugar. It’s ok to use less than the recipe calls for. I know I prefer a less sweet cake. Remember, this is a special occasion treat!

​Cassava Chocolate Cake – by Erin Smith

Before I’d gotten on the real food bandwagon, someone at work brought a store-bought, gluten-free cake.

Most coworkers kept their distance, making snide remarks like “If I’m gonna eat the calories….”

I was among the brave who tried it, and I wish I hadn’t. Terrible, disgusting, flavorless. Contrary to popular belief, chocolate DOES NOT cover all else.

In other words, I know what a bad chocolate cake tastes like, and this ain’t it.

In order to achieve “gluten-free” status, I used cassava flour (it’s all the rage amongst the real foodies). It’s a starchy root, kind of like a potato. Just don’t imagine that it tastes like you’re adding potato flakes, because that would be gross.

Cassava flour has a slight earthy taste to it, but in a good way. It is extremely nutritious, containing good sources of potassium, vitamin C, fiber, and even some protein, iron, and magnesium.

The beautiful part is that you can trade it out in a 1:1 ratio with flour, and still keep a similar consistency. I’d say it’s slightly denser than normal cake, but it just makes it a little fudgier… so no complaints here.

A couple weeks ago, it was our Little Man’s 2nd birthday, which is crazy and insane. He’s not much of a dessert eater – he signs “grapes” or “strawberries” pretty much at every meal. He needed a little encouragement to dig into his chocolate cassava flour cake, but once he did, that stuff got ate.
​

My parents also devoured the cake and passed along rave reviews.


Along with the cassava flour, you’ll see that I’ve used sucanat, organic sugar, and other healthier ingredients. I wouldn’t call this a weight loss meal, but it sure beats processed, GMO ingredients that provide no nutritional benefit or even block other nutrients from entering your system.

In other words, it’s a dessert you can be confident your family will like, and you can sit back, arms crossed, smiling at your achievement. You can check out our date cake and brownie recipe too if those sound tasty to you.

Enjoy your cake!


Ingredients:

Buttercream Frosting
  • 3 Cups organic powdered cane sugar
  • ½ Cup softened pastured butter
  • 1/2 Cup cacao powder
  • 2/3 Cup raw milk

Cake
  • 1 Cup sucanat
  • 1 Cup organic cane sugar
  • 1 Cup softened pastured butter
  • 1 Cup warm filtered water
  • 1 Teaspoon real vanilla
  • 2 pastured eggs
  • ½ Cup cacao powder
  • 1 ½ Cups cassava flour
  • 1 Teaspoon baking soda
  • 1 Teaspoon unrefined sea salt


Instructions:

For Cake:
  1. Preheat oven to 350 degrees and line bottom of 8-inch cake pan with parchment paper and butter.
  2. Cream Sucanat, sugar, softened butter.
  3. Add cacao, warm water, and vanilla.
  4. Mix in eggs one at a time until combined. Do not over-mix or your cake will come out flat.
  5. In separate bowl, sift together cacao, flour, soda, and salt. 
  6. Slowly add flour mixture to wet mixture and mix until combined.
  7. Pour half of the mixture into cake pan and bake for 20-25 minutes until edges look crisp and knife comes out clean when inserted into the middle.
  8. Immediately after taking pan out of oven, run a knife around the edge of the pan. After about 10 minutes, remove from pan and let cool on a cooling rack.
  9. Repeat baking process for second layer.

For Frosting:
  1. Combine powdered sugar, butter, cacao, and vanilla.
  2. Add small amounts of milk until desired consistency is reached, usually very fluffy and not runny or your cake will slide all over. You probably won’t need the entire 2/3 Cup just FYI!
  3. After cake layers are cool, frost the top of one layer, add the top layer and frost the top then the sides. Store covered so the cake doesn’t dry out.
​

Eat Well & Thrive!

Comments
⇠ Back To Blog

Stone Fruit Gelatin Dessert

10/18/2021

 
Picture

When your favorite stone fruits are combined with coconut water and grass-fed gelatin, a delicious treat ensues. These sweet morsels make a beautiful addition to any celebration or for no other reason than self-indulgence.


This time of year, the vendors at farmers markets always offer a variety of stone fruits – plums, peaches, apriums, plumcots, nectarines, pluots, among others. I was able to snag a few pounds of yellow peaches, white nectarines, and donut peaches last week from my favorite vendors. With titles like apriums and pluots – they sound more like something from an astronomy textbook than edible delights but they’re delicious nonetheless.
​
Some of these fruits are hybrids that combine varieties of plums, apricots, and peaches. Others are more of the heirloom variety that have been careful bred to preserve the traditional genome of the fruit. But they are all sweet, juicy and delicious in it’s own way. Shaking off the heels of winter, stone fruits kindly remind us that summer is officially here regardless of the date on the calendar. And as such, recipes calling for these tender fruits are in order. Everything from grilled peaches, to fruit salads, to plum cobblers – now is the time to enjoy the intense sweetness these gems offer.

Picture


Why Gelatin?

I’ve learned to adapt to my children’s picky palates (which has improved tremendously with a real food diet) – but not at the expense of depriving them from much needed nutrition. For example, smoothies can be used as a vehicle to add more nutrition into their diets. I personally, always preferred to eat my greens in the form of a salad, but I quickly realized that crabby toddlers don’t always appreciate baby spinach and radicchio with balsamic dressing, hence the need to add greens to a smoothie.

Likewise, treats made with grass fed gelatin can also a great way to boost the daily nutrient intake. I talk about the origins and health benefits of gelatin in this post on The When, How and Why of Aspic (aka Meat Jello). In short, gelatin is a great source of nutrition including amino acids glycine and proline which are important for proper skin, hair and nail growth as well as optimal immune support. Gelatin also soothes the gut lining, making nutrient assimilation more effective.

Gelatin that is shelf-stable and sold in powder, is essentially bones, cartilage, and tendons cooked down for extended period of time, breaking down the collagen and then dried and ground into fine powder for us to use. That’s why it’s incredibly important that you seek out the best quality gelatin. I’m currently using THIS brand but have used THIS with great success as well. The good news is that gelatin is making a comeback and more and more companies are seeking the best quality sources to make gelatin for their always-growing customer base.

In addition to regular soups made from traditionally prepared bone broth, I am purposeful in making gelatin treats as snacks or deserts for an extra boost of nutrition. These Gut-Healing Strawberries n’ Cream Gelatin Cups are a hit at our home, and they especially make a extraordinary treat for a birthday and other celebrations.

by Anya @ Prepare & Nourish
​

Ingredients:

  • 1 1/2 pounds of stone fruit
  • 1 1/2 tablespoons of gelatin (THIS or THIS brand)
  • 1 1/2 cup of coconut water, divided
  • 1/2 cup boiling water


Tools needed:

box grater, glass measuring cup, muffin pans, or bundt cake pan
​

Instructions:

I love using a variety of stone fruits for different tones of sweetness in these gems. I layered yellow peaches, white nectarines, followed by backyard plums, all chopped in miniature pieces. You can also use a box grater, and grate on largest if that’s easiest. Sprinkle gelatin over 1/2 cup of coconut water in a glass measuring cup, give a quick stir and set aside to “bloom”. Meanwhile, place the chopped fruit in muffin pans or mini bundt cake pans for individual servings (great for parties) but a regular bundt cake pan works great too.

Add 1/2 cup of boiling water to the bloomed gelatin (it should have set by now) and stir well with a fork. There should be no clumps. Add additional 1 cup of coconut water and continue to stir well. Add 1-2 tablespoons of honey, if you care to have it more sweeter, otherwise, completely leave it out and enjoy the sweetness of the fruits. Carefully pour into the muffin cavities, completely covering the fruit and coming all the way to the top. Give the pan a gentle tap on the counter to make sure that the coconut water reaches between the fruit and to the bottom. Place in the refrigerator for 2 hours, overnight is best.

To Unmold:​

Prepare a sink of 1″ of warm water. Place the gelatin pan directly into the water for 10-15 seconds, being careful not to get water into the fruit. Remove the pan from the sink and cover with a large cutting board or another flat surface. Quickly invert the gelatin onto the board. At this point, you can stick it back in the refrigerator or plate.

Stone Fruit Gelatin Dessert makes a beautiful addition to any party, 


​Whether you have them in small single servings or a decorative bundt cake pan. More than that, it adds nutrition from the gelatin and electrolytes from the coconut water, making this a perfect treat on a warm day. I’ll be sure to make this several times as long as stone fruits are readily available.
​

Eat Well & Thrive!

Comments
⇠ Back To Blog

Peanut Butter Cups. Quick and Easy.

10/18/2021

 
Picture

It’s like clockwork every month! Our hormones go amok, and we’re hit with PMS and the accompanying sweet tooth cravings. Why does this happen? Our body’s natural response to hormonal changes around our period can cause a drop in blood sugar levels. And this can lead to cravings for foods loaded with sugar. Also, if you are specifically craving chocolate, that’s your body yelling at you that you need magnesium.

Sure, it’s nice to treat yourself during this time. Heck, you deserve it! But you should still be mindful to not overdo it with junk food that can sabotage your health goals. You may enjoy it for a moment, but once the sugar rush dissipates, you’re right back to craving sweets again.

There’s more. Sugar, particularly refined sugar, is an inflammatory that causes your body to retain water and sodium. This may cause you to experience more bloating, cramping, and mood swings. No, thank you!

So, what’s a girl in the throes of PMS to do? Don’t worry, I have a special treat for you to satisfy these cravings when they hit.

Ingredients to Beat Those Period Cravings

It’s my recipe for a healthier version of your traditional sugar-laden peanut butter cups. These quick and easy homemade chocolate peanut butter cups are the perfect treat to nip those pesky PMS cravings we get every month. Made with all-natural good-for-you ingredients, they’re delicious AND nutritious. All you need are three simple ingredients: dark chocolate, coconut oil, and peanut butter. It’s that simple!

Now, let’s talk about those ingredients. You may be wondering, is dark chocolate really ok during your period? Surprisingly, it is! Not only can dark chocolate satisfy your sweet tooth during that time of the month, but it’s high in potassium. This nutrient can stop you from retaining water and feeling bloated. Potassium also helps your muscles to function, which is ideal for when period cramps hit.

Then there’s peanut butter, which can benefit your health in many ways. It contains healthy fats, fiber, and protein that can help you feel fuller longer. And it’s full of nutrients and vitamins like vitamin E, which reduces inflammation and can help with cramping. Plus, peanut butter is a complex carbohydrate, so it breaks down more slowly in your system. This means you don’t experience the big spike in blood sugar levels that can come with refined sugar.

For our third and final ingredient, we have coconut oil. This superfood can actually help balance your hormones, which can go all sorts of crazy during your period. How? The fatty acids in coconut oil can help hormone functions that support the creation, processing, and elimination of estrogen and progesterone. This can lead to the hormonal balance your body needs.

Ok, enough chatting. Here’s everything you need to know to make these bad boys!
​

Healthy Homemade Peanut Butter Cups

A quick and easy recipe for that time of the month.

No-Bake, Raw, Gluten-free, grain-free, low carb, low sugar, vegan, vegetarian, dairy-free, egg-free, Paleo, Keto
​
Prep Time: 15 minutes
Chilling Time: 30 minutes
Total Time: 15 minutes
Servings: 12

Ingredients:

  • 8-12 ounces dark chocolate
  • 1 cup all-natural creamy peanut butter, with no added sugar (almond butter if Paleo)
  • 6 tablespoons virgin coconut oil, melted


Directions:

  1. Line a 24-cup mini muffin pan or spray with coconut oil cooking spray and set aside.
  2. Chop chocolate into small pieces. Place in a medium glass bowl and add 3 tablespoons of coconut oil.
  3. Place the bowl over a pot with simmering water. Continually stir with a wooden spoon or spatula until chocolate is completely melted to avoid burning the chocolate.
  4. Once the chocolate is melted, set heat to low.
  5. Pour 1 tablespoon melted chocolate into each cup. Place cups in the freezer for 5 minutes or until chocolate is set while making the peanut butter layer.
  6. Add peanut butter and 3 tablespoons of coconut oil to a medium bowl. Stir until incorporated evenly.
  7. Take the muffin pan out of the freezer and scoop 1-2 teaspoons of the peanut butter mixture to each cup. Place in the freezer for 15 minutes.
  8. Take the muffin pan out of the freezer and pour the remaining melted chocolate on top of the peanut butter. Return to the freezer for 30 minutes.
  9. Once set, pick up the muffin pan and shake and tap to help release the chocolate cups.
  10.  Optionally, sprinkle a pinch of Himalayan sea salt on top.
  11.  Enjoy!
​

Storage:

Place them in a freezer-safe container, store them in the fridge or freezer and enjoy anytime you need a healthy treat! They should last about 3 months or longer.
​

Consistency:

If the peanut butter cups are too thick, add an extra tablespoon of coconut oil or peanut butter.
​

Note:

 If you’re allergic or sensitive to peanuts, you can sub any nut butter (almond, cashew, hazelnut).
​

Guilt-Free Treat to Calm PMS Cravings


I hope you love these nutritious treats to calm your PMS cravings. What’s your favorite sweet treat or guilty pleasure snack when you PMS? Let us know in the comments.

Did you make this quick and easy recipe? Don’t forget to share a picture and mention @reallifeoutlawblog and #reallifeoutlaw.

Be Well & Thrive!

Comments
⇠ Back To Blog

Strawberry-Chia Yogurt Parfait

10/15/2021

 
Picture

Strawberry- chia jam drizzled atop probiotic-rich yogurt makes for a wonderful treat.


Enjoy this treat from Anya at Prepare and Nourish!
​
​
We live a few miles from one of the most beautiful and refreshing rivers in California. The scenery is gorgeous and I love the evenings when we get to watch the sun set over the horizon. What I don’t love is coming home with the kids nagging me because they are starving and are going to die from hunger in 4 seconds.

Intentionality is the Name of the Game

A mom has to have many tricks up her sleeve in order to keep the house orderly and bellies full. Having premade strawberry chia jam and yogurt on hand for a quick snack is one of mine. This delicious jam can be made days in advance or just before assembling this simple parfait together. It doesn’t require a lot of effort and can also boast a nutritional punch with the added kombucha, although that is entirely optional. I prefer to add a few tablespoons of it since I usually use my unsweetened homemade yogurt. Just don’t get kombucha-happy, or else the chia jam will be a tad on the thin side for this to be considered parfait.

A Healthy Snack

I remember when those little yogurt cups came out that had separate compartments with some variety of fruit jam. My kids went bonkers over those. I went bonkers over those. What an ingenious idea – to bring probiotic-rich yogurt and sweet fruit jam together for a completely different depth of flavor. Too bad those yogurt cups had a ton of nauseating ingredients. Thankfully, we don’t have to succumb to these conveyor-belt creations. We gladly make our own with real, wholesome ingredients that are nourishing to our bodies and the little bodies in our care.

A Simple Snack

This parfait can quickly be made after a day at the river or a strenuous day doing chores or just lounging around in your yoga pants doing everything but yoga. It comes together easily but boasts a galore of flavor and nutrition. The addition of chia seeds some substance while strawberries add that desired sweetness. Of course, the option is yours whether you want to go with vanilla, sweetened yogurt or go hard-core and use plain yogurt. Just be sure to source the highest quality ingredients your budget and resources allow.

Picture

Ingredients:

  • 1 pound of fresh strawberries, washed and hulled
  • 1 tablespoon chia seeds
  • 2-4 tablespoons kombucha (to thin out strawberry jam) – learn to make your own 
  • 3 cups plain OR vanilla yogurt*


Directions:

Add all strawberries and chia seeds into a small bowl or mason jar (I prefer the latter for ease of blending with immersion blender). Blend both ingredients, add kombucha as needed for a thinner texture. You may also add plain water or coconut water. For all these I use a blender I got from reading sites as Zozanga and others so I can enjoy all these recipes easily.

In a glass, scoop out about 1 1/2 cups of vanilla yogurt, and drizzle or spoon (depending on how thick you desire the jam to be) the strawberry-chia seed mixture on top. Garnish with additional strawberries and enjoy with a spoon!
​
Note: Try to source a local-to you farm that produces high quality vanilla flavored yogurt. You can also add vanilla and honey or maple syrup to my Homemade Yogurt.

I hope you are all enjoying your summer. What has been your favorite routine summer activity thus far?

Comments
Just Breathe

Latest Blogs

Kava DSM Fall Favorites...
5 Spices You Should Be Cooking...
​Stuffed Zucchini Boats 2 Ways
​
Cassava Flour Chocolate Cake

Useful Links

About Sarah
Recipes
Blog
​Contact

About RLO

Real Life Outlaw is dedicated to providing crucial nutrition facts and individual health advisory.
​© 2021 Real Life Outlaw. Site by Northgate Marketing